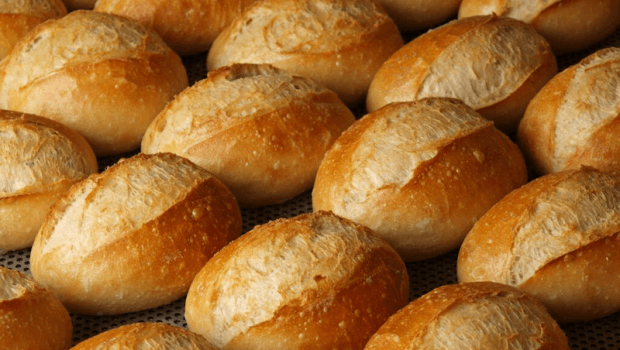
The brötchen or the little bread is among the most commonly found breads in Germany. Sometimes you can also find certain recipes where the brötchen carries garnishing of sesame or poppy or sunflower seeds. There are also recipes in which you will find that these rolls are made from doughs which are enriched by using egg whites and then some more of the egg white is brushed on the surface just before they enter the oven. Interestingly enough by using the egg white you can attain an incredible crust and crumbs.
As far as breads in general are concerned, their history goes back almost 10,000 years. This is a point in time when agriculture had just begun and grounding these grains for the purpose of creating something different was just being experimented through. The making of breads was completely changed when two of the following things were discovered:
- Heating on all sides: It was realised that when you surround the bread with heat on all sides instead of cooking them on stones, through this process round breads could be baked. Furthermore, there on the invention of the oven happened and things resulted in what they are today.
- Fermentation: It was realised that when the dough is let to stand for several days then it ends up rising because the yeast gets attracted towards it. This process resulted in the production of a more airy and lighter bread.
Particular in Germany breads are regarded to be something which is more than just food. Breads are an integral part of the Germanic culture. In Germany you can indeed find more varieties of breads than anywhere else. Germans produce approximately 300 varieties of white and brown breads along with rolls and mini-breads whose number reaches over 1200.
Breads make up a large part of the Germanic cuisine. You can find breads being served irrespective of the meal time. Usually Brötchen & Kleingebäck are served at the time of breakfast. Their most popular accompaniments are: butter, hard boiled eggs, wurst and cheese.
Recipe
The brötchen can be found under its synonymous names such as: Kipfen, Wecken, Semmel, Weggli, Schrippe, Feierabend Brötchen, and Rundstück. All these names represent the very same round rolls which are normal, white and small, and can be found in every breakfast bread baskets throughout Germany and Austria. They are made out of a lean dough which is steamed in the oven. Through the simple process that follows you can get this unique speciality which carries the crispy taste of a bread roll. The preparation also involves an overnight sponge through which deeper dimensions are attained.
There is no specific meal with which the brötchen is served. More like it can be eaten in any meal. However it is preferred at the time of breakfast. The following recipe should ideally take up 1135 minutes and yield up to 40 small rolls.
Ingredients
For Day 1:
- Bread Flour: 2 c or 250 grams (you can prefer any unbleached variety of flour)
- Cold Water: 1 1/3 c or roughly 300 ml.
- Instant yeast: ½ teaspoon or 2.5 grams
For Day 2:
- Flour: 5 1.2 c or 725 grams
- Water: 1 1/3 c or 300 ml + some extra water just in case the requirement arises
- Instant yeast: 1 teaspoon or 5 grams
- Salt: 1 ½ teaspoon or 12 grams
Method
You will have to begin working on brötchen a night before.
Firstly you will be required to take a large sized bowl into which all the ingredients will be added. Make sure that the bowl is made up of an unreactive material. Ideally a ceramic or a glass bowl would suffice.
Then mix together the flour, water and yeast till the mixture becomes smooth and free of lumps. You will then have to cover the opening of the bowl using a plastic wrap or a plate. The idea is to not let the bowl become airtight. Then let the bowl remain somewhere on the side for the overnight period.
The very next day, approximately 8 to 24 hours later take a similar bowl (as mentioned above). In this bowl add the sponge that you made earlier along with 5 cups of flour, then extra water and yeast.
Then knead the dough for 8 to 10 minutes. You can knead the dough by using a stand mixer and then add keep ready approximately half a cup of flour which you will have to go on adding into the mixing bowl. The idea here is to reach a point where the dough clears the bowl. That is the dough should not stick on to the walls of the bowl or as little as possible.
With that done, sprinkle salt over the dough and mix for 4 to 5 minutes more. The content of the salt can vary between 1 to 1 ½ tablespoons.
Now, if the consistency of the dough is not smooth and tacky enough, then in that case you will have to adjust it by adding flour or water but in very small quantities so that you don’t make a mess of it. Be careful and it will turn out just fine.
Now, with that done, the dough should be ready. Place the dough on a clean working table and form it into a nice round ball. Then take a large bowl as mentioned above or a dough doubler and oil its inside surface. Then place the dough in the bowl and cover its top by using a damp towel or a simple plastic wrap. Let the dough settle and ferment for approximately 2 hours or till the point it reaches twice its original size at room temperature.
In the mean time you can prepare the work surface again. This time sprinkle a gentle film of flour on top of the surface. Next you will be required to place the dough on top and form it into the shape of a log. Then go on cutting approximately pieces of 2 ounces or 50 grams each by using a bench knife or a spatula. Through this process you can make approximately 40 small rolls. Moreover, you can also choose your preferable size and not go with the one mentioned here. The idea is for each of the balls to be approximately of the same size and weight because this will further facilitate the cooking process. For this purpose you can use a handy scale. With the pieces cut, you can let them stay still and rest for a while.
Next, turn these dough pieces into balls or any other preferred shape that you desire. Then coat these balls further in flour and keep place them on a parchment paper. Remember to place each of them at a reasonable distance of approximately 2 inches. This will allow the bread to have ample amount of space to swell when it is inside the oven. Also it will prevent these balls from sticking to each other.
When that is done cover them using a damp cloth and let them rest for about an hour. Through this process the balls will be able to ferment and rise further.
In the mean time you can go on and preheat the oven at 450 degrees Fahrenheit for an hour. Then you can place an old pan on the bottom rack of the oven. Before placing the rolls into the oven remember to slash them on one side either by using a serrated knife or lame or a razor blade.
Finally they are ready to go inside the oven. Place them on the very next tray either exactly on top of the stone in case it is available or simply on a baking sheet. Before closing the door, take about 1 cup of regular water and pour it into the old baking pan. With this you can close the door and let the rolls get baked for 15 to 20 minutes. In case the necessity arises you can also go on and turn the baking sheet. The aim is to attain an even brown colouring.
When they are done you can cool the rolls on wire racks so that the bottom of the rolls does not get soggy.
These rolls are best served and consumed warm while they are their crispy best. However, you can also freeze them and then re-crisp them in a hot oven. If you are planning a picnic or a potluck, then simply wrap them in a fabric napkin and then place them in a basket.